With the popularity of the Xiaofang camera from Xiaomi, I started my search in late 2017 when I stumbled upon the Xiaomi Dafang. This new model features pan and tilt functions at roughly the same price as the old model, so, I figured ‘why not’ and bought both to try out.
This camera is appealing because it’s a 1080p pan-tilt camera for $30, however the stock firmware does not have RTSP functionality for streaming video.
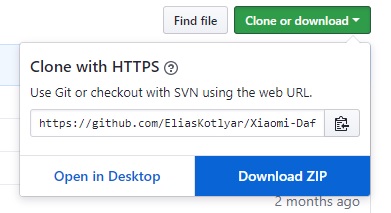
Ultimately, the Dafang arrived first, and trying to set it up with the official tools got me nowhere. Elias Kotlyar has developed a fork of the popular samtap/fang-hacks project on Github, called Xiaomi-Dafang-Hacks. In this post I hope to explain how I’ve been able to use this camera here in Canada.
So, we’ll start with a clone of the project by downloading the package in a ZIP file.
Before we can load on the custom firmware, we’ll need a micro SD card formatted with a FAT filesystem–not EXFAT or FAT32, we will need FAT16, which has a max size of 4 GB. So, I’ve got a 16 GB card here and I’ll need to make a small partition to load the files onto, 100 MB is enough, as long as it’s under that 4 GB you should be good to go.
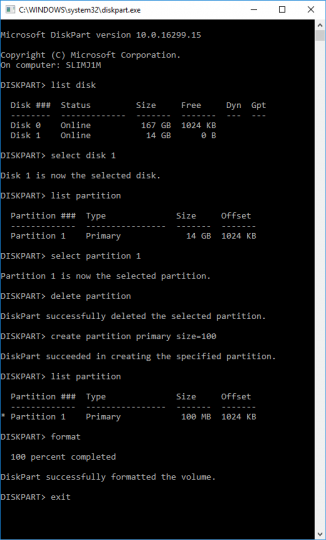
I’m running Windows 10 for now, so, let’s get DISKPART up and running– Win + R, type ‘diskpart’ and press ‘OK’.

The DISKPART tool window will open and you will be presented with a DISKPART> prompt.
To start, type LIST DISK to find the disk you want to change. You will need to select the disk to work on; in my case it’s the 16 GB SD card (showing up as 14 GB) by typing SELECT DISK 1. Make sure the correct disk is selected by typing LIST DISK again.
Next we’ll kill the partition that comes on the SD card, if applicable. Type LIST PARTITION to see a list of all partitions. To select the first one, type SELECT PARTITION 1, then type DELETE PARTITION to remove it.
We’ve got a blank SD card now. To create a partition, type CREATE PARTITION PRIMARY SIZE=NNN where NNN is the partition size in MB. I made a 100 MB partition. Check to make sure it by typing LIST PARTITION. Type FORMAT to format the filesystem.
Finally type EXIT to close the application.
Unzipping the compressed archive downloaded above, navigate to the hacks\cfw directory and find the newest cfw binary file. In my case this is cfw-1.3.bin — copy only this file to the SD card’s 100 Mb partition created above and rename this file to demo.bin
Put the SD card into the camera and while holding down the setup button, plug the power into the camera. Continue to hold the setup button down until the light changes from yellow to blue. The firmware is now being flashed to the camera. When the base starts to move, the firmware is flashed and the power cable can be unplugged.
At this point, if you plug the camera back in, the default firmware will load up. So, with the camera unplugged, eject the SD card and erase any and all files (including demo.bin).
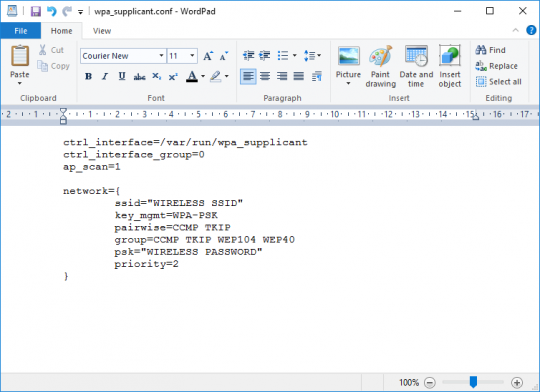
Get back to the unzipped archive and navigate to the firmware_mod directory and copy this folder’s contents to the SD card. On the SD card, go into the config directory and open wpa_supplicant.conf with your favourite editor (Windows protip: use wordpad and not notepad). Put in your WiFi network’s SSID and password inside the quotes. Save this file and eject the SD card.
Put the SD card back into the camera and plug it in.
Now, the yellow light will go on, switch to blue, and back to yellow. The base will not move, there will be no lights blinking, and this is the indication that the firmware flash worked and the camera has now running the files from the SD card.
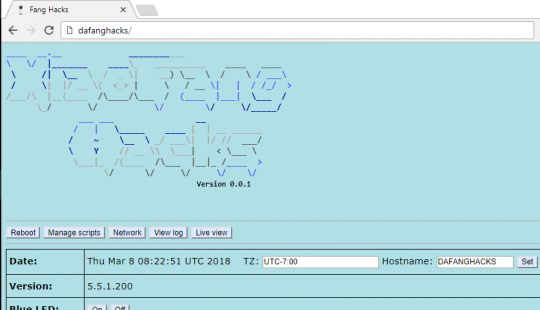
The default hostname of the camera will be dafanghacks, so we can open a browser and navigate to dafanghacks/ for the camera interface. From here, we can start playing with the camera configuration and controlling the pan/tilt functions!
From here, RSTP is enabled and I can integrate this camera into my HASS.io installation and over VPN check in on my puppies while I’m away at work!
Hopefully that helps those who are stumped. The first time I tried this I hit a wall at the definition of a FAT filesystem and found this would not work with FAT32.
Leave a comment for any questions!
P.